
Weather Data Pipeline In Azure
Setting Up Data Processing Workflow on Azure
written with the help of ChatGPT
A lot of this project was inspired and was made possible by following a tutorial by Nick. Other internet educators were helpful as well.
Introduction
I recently tackled a project where I set up a data processing workflow on Azure. In this process I set up scripts to query weather data from a Berlin weather station once an hour, around the clock. Once a day, this data gets automatically uploaded to the cloud, where it’s cleaned and put into a neat database, ready for reporting, analysis, or other applications.
Cloud Setup
1. Linux VM Setup
I set up a Linux Virtual Machine which will function as the round-the-clock retriever of data (more on this later). I also made the VM accessible via Remote Desktop Protocol (RDP).

2. Datalake
I also set up a datalake. It’s like a storage space where we can neatly organize and manage all the files that come in. Here is the folder hierarchy (relevant for later):
data container
  ├── intake_raw
  ├── cleaned
  │   └── transactions
  └── archived_raw
- The files will be uploaded into the intake_raw folder.
- Once processed, the data from the files in the intake_raw folder will end up in the cleaned folder as a single CSV file
- The transactions folder logs some of the generated metadata
- Once processed, the files from intake_raw get moved here for long-term cool storage
3. Azure SQL Server
After the data is cleaned, it can be stored on an Azure SQL Server. The data can now be easily used for analytics, reporting, or even ML purposes.
Data Generation Process
1. Getting Weather Data
I wrote a script which uses the OpenWeather API to request weather data from a specified location - in this case Berlin. The code for the script is available below:
# Import necessary libraries
import requests
import pandas as pd
import json
from datetime import datetime

# OpenWeatherMap API key
api_key = ''

# Construct the API URL for Berlin, Germany
url = f'https://api.openweathermap.org/data/2.5/weather?q=Berlin,germany&appid={api_key}'

# Make a GET request to the OpenWeatherMap API
response = requests.get(url)

# Check if the request was successful (status code 200)
if response.status_code == 200:
    # Parse the JSON response
    data = response.json()

    # Print the retrieved weather data (for testing purposes)
    print(data)

    # Add today's timestamp to the file name
    timestamp = datetime.now().strftime("%Y-%m-%d_%H.%M.%S")

    # Define the output file path
    output_file_path = f'/your/data-path/weather/generated_data_{timestamp}.json'

    # Write the JSON data to a file
    with open(output_file_path, 'w') as f:
        json.dump(data, f)

else:
    # Print an error message if the request was not successful
    print('Error fetching weather data')
Below is what a sample file generated by this code looks like. There is some useful information here, but I don’t want all of it, and some of it is displayed in unusual units, like temperature in Kelvin instead of Celsius or Fahrenheit.
{
  "coord": {
    "lon": 13.4105,
    "lat": 52.5244
  },
  "weather": [
    {
      "id": 800,
      "main": "Clear",
      "description": "clear sky",
      "icon": "01d"
    }
  ],
  "base": "stations",
  "main": {
    "temp": 268.73,
    "feels_like": 265.46,
    "temp_min": 266.98,
    "temp_max": 269.81,
    "pressure": 999,
    "humidity": 89
  },
  "visibility": 10000,
  "wind": {
    "speed": 2.06,
    "deg": 210
  },
  "clouds": {
    "all": 0
  },
  "dt": 1701327345,
  "sys": {
    "type": 2,
    "id": 2039371,
    "country": "DE",
    "sunrise": 1701327152,
    "sunset": 1701356255
  },
  "timezone": 3600,
  "id": 2950159,
  "name": "Berlin",
  "cod": 200
}
2. Sending the Data to the Azure Datalake
With some help from a colleague’s script, I made another script. This one connects to Azure and puts the files generated by the weather data script into the Azure datalake set up earlier.
A few notes on the script. This is a batch script that looks for any JSON files in the output folder and pushes them to the datalake. If this is successful, then the script moves the files to an archive folder. This setup enables the script to always look for new files, without keeping in memory a list of ones that it already processed; they will simply be in the archive folder.
# Import necessary libraries
from azure.storage.blob import BlobServiceClient
import os
import time

# Note: The part of this code that connects to Azure was obtained from Pavel Petrov

# Azure Storage Account connection information
connection_string = 'DefaultEndpointsProtocol=https;AccountName=fsldkflwllwlwdde;AccountKey=HugeACccountKeyherw23428838sdfh99d==;EndpointSuffix=core.windows.net'

# Name of the Azure Storage Container
container_name = 'container-name'

# Local path where weather data files are stored
local_path = '/your/data-path/weather/'

# Establishing connection to Azure Storage Account
blob_service_client = BlobServiceClient.from_connection_string(connection_string)

# Iterating through files in the local folder
for each_file in os.listdir(local_path):

    # Checking if the file has a '.json' extension
    if each_file[-4:] == 'json':

        # Defining the local file path and setting up the Azure Blob client
        upload_file_path = local_path + each_file
        blob_name = f'intake_raw/{each_file}' # files will go into the intake_raw folder in the datalake
        blob_client = blob_service_client.get_blob_client(container=container_name, blob=blob_name)

        # Uploading the file to Azure Blob Storage
        with open(file=upload_file_path, mode="rb") as data:
            blob_client.upload_blob(data)

        # Adding a delay to avoid checking whether the upload worked in the next step (adjust as needed)
        time.sleep(3)

        # Checking if the file has been successfully uploaded
        if blob_client.exists():
            print(f'{each_file} successfully uploaded; archiving')

            # Archiving the file by moving it to the 'archive' folder in the datalake
            os.rename(upload_file_path, local_path + 'archive/' + each_file)
        else:
            print('Upload not successful')
3. Automating the Above Scripts with Crontab
Crontab is a process available in Linux that allows users to set up scripts to run automatically at set intervals. I set up the weather API script to run once an hour, and the data migration script to run everyday at 8:02am.
The 8:02am runtime is to allow 2 minutes for the weather API script to finish running.
Crontab Configuration:
# the weather job below gets run every hour
0 * * * * /path-to/python3 /home/weather_data_calls_prod.py

# the data migration job for the weather files runs once a day at 8:02am
2 8 * * * /path-to/python3 /home/sending_data_to_azure_prod.py
Processing the Data in the Cloud
Now that the files are automatically generated and pushed to the cloud, we need to automate the server side processes. New files will be appearing in the datalake daily. They will need to be processed and pushed to the Azure SQL Database.
I put together the following pipeline in Azure Data Factory. It grabs new files and cleans up the data they contain. After that, it puts the clean data into a different spot in the datalake (you can check out the folder setup above). Finally, it picks up the processed data from there and puts it into the Azure SQL database. All this is done automatically on a schedule, a little after the crontab jobs are expected to finish.
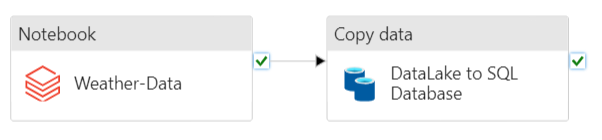
1. Cleaning the data in a Databricks Notebook
The first step in the pipeline is to send the data to a Databricks notebook, where it will be cleaned, and put back in a different folder in the datalake - the “cleaned” folder.
Databricks Notebook:
# Setup
# Import necessary libraries
from pyspark.sql.functions import explode, col, explode_outer
import pandas as pd
from pyspark.sql.functions import col, date_format

# Set the Azure Storage SAS Key in Spark configuration
sasKey = 'your_sas_key'
spark.conf.set(f"fs.azure.sas.container.forblobstorage.blob.core.windows.net", sasKey)

# Define the data folder path in Azure Storage
data_folder = "wasbs://container@namehere.blob.core.windows.net"


# Functions to be used later

# Function to convert temperature from Kelvin to Celsius
def k_to_c(temp):
    return round(temp - 273.15)

# Function to convert temperature from Kelvin to Fahrenheit
def k_to_f(temp):
    return round(9 / 5 * (temp - 273.15) + 32)


# Working with the files

# List files in the 'intake_raw' subfolder of the data folder; this is where new files are scripted to appear daily
files = dbutils.fs.ls(data_folder + '/intake_raw/')
files

# Initialize an empty DataFrame for export
export_df = pd.DataFrame(columns=['latitude', 'longitude', 'datetime_raw', 'feels_like_raw',
'humidity', 'pressure', 'temp_raw', 'id', 'country', 'city', 'sunrise_raw', 'sunset_raw', 'timezone_raw', 'weather_desc', 'wind_deg', 'wind_speed'])

# Iterate through files
for file in files:
    if 'generated_data' in file.path:
        # Read JSON data into a Spark DataFrame
        df = spark.read.option("multiline", "true").json(file.path)
        # convert it to a dictionary for easier handling
        pd_df = df.toPandas().to_dict()

        # Extract relevant information and append to export DataFrame
        new_row = {
            'latitude': pd_df['coord'][0]['lat'],
            'longitude': pd_df['coord'][0]['lon'],
            'datetime_raw': pd_df['dt'][0],
            'feels_like_raw': pd_df['main'][0]['feels_like'],
            'humidity': pd_df['main'][0]['humidity'],
            'pressure': pd_df['main'][0]['pressure'],
            'temp_raw': pd_df['main'][0]['temp'],
            'id': pd_df['id'][0],
            'country': pd_df['sys'][0]['country'],
            'city': pd_df['name'][0],
            'sunrise_raw': pd_df['sys'][0]['sunrise'],
            'sunset_raw': pd_df['sys'][0]['sunset'],
            'timezone_raw': pd_df['timezone'][0],
            'weather_desc': pd_df['weather'][0][0]['description'],
            'wind_deg': pd_df['wind'][0]['deg'],
            'wind_speed': pd_df['wind'][0]['speed']
        }
        export_df.loc[len(export_df)] = new_row

# Remove duplicate rows and sort by 'datetime_raw'
export_df = export_df.drop_duplicates().sort_values(by='datetime_raw')


# Rework the data

# Convert epoch timestamps to datetime objects in Berlin's timezone
export_df['sunset'] = pd.to_datetime(export_df['sunset_raw'] + export_df['timezone_raw'], unit='s')
export_df['sunrise'] = pd.to_datetime(export_df['sunrise_raw'] + export_df['timezone_raw'], unit='s')
export_df['datetime'] = pd.to_datetime(export_df['datetime_raw'] + export_df['timezone_raw'], unit='s')

# Convert temperature values to Celsius and Fahrenheit
export_df['feels_like_c'] = k_to_c(export_df['feels_like_raw'])
export_df['feels_like_f'] = k_to_f(export_df['feels_like_raw'])
export_df['temp_c'] = k_to_c(export_df['temp_raw'])
export_df['temp_f'] = k_to_f(export_df['temp_raw'])


# Define the desired column order
desired_order = ['datetime', 'country', 'city', 'latitude', 'longitude', 'temp_c', 'temp_f', 'feels_like_c', 'feels_like_f', 'weather_desc', 'wind_deg', 'wind_speed', 'humidity', 'pressure', 'sunrise', 'sunset', 'id']

# Create a new DataFrame with the desired column order
export_df_reordered = export_df[desired_order]

# Create a Spark DataFrame from the reordered Pandas DataFrame for exporting
export_df_reordered_spark = spark.createDataFrame(export_df_reordered)


# Format datetime columns
export_df_reordered_spark = export_df_reordered_spark.withColumn(
    'datetime',
    date_format(col('datetime'), 'yyyy-MM-dd HH:mm:ss')
)

export_df_reordered_spark = export_df_reordered_spark.withColumn(
    'sunrise',
    date_format(col('sunrise'), 'yyyy-MM-dd HH:mm:ss')
)

export_df_reordered_spark = export_df_reordered_spark.withColumn(
    'sunset',
    date_format(col('sunset'), 'yyyy-MM-dd HH:mm:ss')
)


# Output

# Write the Spark DataFrame to Azure Storage as CSV
# this will go into the "cleaned" folder
export_df_reordered_spark.coalesce(1).write\
    .option("header", "true")\
    .mode("overwrite")\
    .csv('wasbs://container@namehere.blob.core.windows.net/cleaned/')


# Cleanup

# Define the path for the cleaned data in Azure Storage
data_folder_cleaned = "wasbs://container@namehere.blob.core.windows.net/cleaned"

# List files in the cleaned data folder
files_cleaned = dbutils.fs.ls(data_folder_cleaned)

# Move transaction files to a separate folder
for file_info in files_cleaned:
    if file_info.name.startswith("_"):
        dbutils.fs.mv(file_info.path, data_folder_cleaned + "/transaction_files/")


# Archive original raw files in a separate folder
for file_info in files:
    if file_info.name.startswith("generated_data"):
        dbutils.fs.mv(file_info.path, data_folder + "/archived_raw/")
2. Loading the Clean Data into an Azure SQL Server
This step in the pipeline grabs the new clean data from the “cleaned” folder, which functions as the source, and puts it into the sink, which, in this case, is a table in the Azure SQL Database, that I named weather_data.
Here is what the following query from that table returns, as of writing this.
Query:
SELECT TOP (10) * FROM [dbo].[weather_data]
Output:
| datetime                      | country | city   | latitude | longitude | temp_c | temp_f | feels_like_c | feels_like_f | weather_desc       | wind_deg | wind_speed | humidity | pressure | sunrise                     | sunset                      | id      |
|-------------------------------|---------|--------|----------|-----------|--------|--------|--------------|--------------|--------------------|----------|------------|----------|----------|-----------------------------|-----------------------------|---------|
| 2023-11-13T18:56:11.0000000   | DE      | Berlin | 52.5244  | 13.4105   | 7      | 45     | 4            | 39           | broken clouds      | 147      | 6.71       | 86       | 988      | 2023-11-13T07:23:50.0000000 | 2023-11-13T16:17:29.0000000 | 2950159 |
| 2023-11-14T12:58:57.0000000   | DE      | Berlin | 52.5244  | 13.4105   | 13     | 56     | 12           | 54           | broken clouds      | 240      | 12.07      | 72       | 987      | 2023-11-14T07:25:39.0000000 | 2023-11-14T16:15:59.0000000 | 2950159 |
| 2023-11-14T16:59:48.0000000   | DE      | Berlin | 52.5244  | 13.4105   | 11     | 53     | 11           | 51           | few clouds         | 243      | 9.39       | 83       | 987      | 2023-11-14T07:25:39.0000000 | 2023-11-14T16:15:59.0000000 | 2950159 |
| 2023-11-14T21:00:00.0000000   | DE      | Berlin | 52.5244  | 13.4105   | 10     | 51     | 10           | 49           | scattered clouds   | 225      | 6.71       | 82       | 987      | 2023-11-14T07:25:39.0000000 | 2023-11-14T16:15:59.0000000 | 2950159 |
| 2023-11-15T00:57:04.0000000   | DE      | Berlin | 52.5244  | 13.4105   | 10     | 49     | 6            | 43           | broken clouds      | 246      | 7.6        | 90       | 985      | 2023-11-15T07:27:27.0000000 | 2023-11-15T16:14:31.0000000 | 2950159 |
| 2023-11-15T04:57:00.0000000   | DE      | Berlin | 52.5244  | 13.4105   | 9      | 48     | 6            | 42           | overcast clouds    | 263      | 7.6        | 89       | 988      | 2023-11-15T07:27:27.0000000 | 2023-11-15T16:14:31.0000000 | 2950159 |
| 2023-11-15T08:57:40.0000000   | DE      | Berlin | 52.5244  | 13.4105   | 7      | 45     | 3            | 38           | overcast clouds    | 280      | 8.75       | 87       | 994      | 2023-11-15T07:27:27.0000000 | 2023-11-15T16:14:31.0000000 | 2950159 |
| 2023-11-15T12:59:39.0000000   | DE      | Berlin | 52.5244  | 13.4105   | 8      | 47     | 5            | 40           | overcast clouds    | 297      | 7.15       | 83       | 999      | 2023-11-15T07:27:27.0000000 | 2023-11-15T16:14:31.0000000 | 2950159 |
| 2023-11-15T16:58:26.0000000   | DE      | Berlin | 52.5244  | 13.4105   | 8      | 47     | 6            | 43           | clear sky          | 290      | 3.58       | 78       | 1001     | 2023-11-15T07:27:27.0000000 | 2023-11-15T16:14:31.0000000 | 2950159 |
| 2023-11-15T17:28:58.0000000   | DE      | Berlin | 52.5244  | 13.4105   | 8      | 46     | 6            | 43           | few clouds         | 310      | 2.68       | 79       | 1001     | 2023-11-15T07:27:27.0000000 | 2023-11-15T16:14:31.0000000 | 2950159 |
Conclusion
This is a simple pipeline that I plan to leave running for the near future. I like that it’s meant to be fully automatic. Theoretically no user input will ever be needed to keep this data generation going (apart from running updates and maintenance).
In some way, data pipelines, or automated processes in general, remind me of the way our cells work at the molecular level. They have these immensely complex processes that have been set up and are running according to how they’ve been set up. I find that appealing. For an illustration of this, skip to 3:35 of this Ted talk.
Next Steps
Looking ahead, the focus is on creating a simple Flask dashboard. This dashboard will give us a quick look at what’s happening with the data trends in Berlin, updating once per day.
Known Bugs
It looks like the sunrise and sunset times are not correct. They should be converted to a time object, not a datetime object. More digging to be done here.